In the world of electronics cooling, ensuring efficient heat transfer between components and their heat sinks is crucial.Thermally conductive grease improves heat transfer from parts like CPUs and GPUs by filling up tiny gaps.. In this article, we’ll explain what thermally conductive grease is, how it works, and why it’s an essential component for keeping your devices running cool and efficiently.
What is Thermally Conductive Grease?
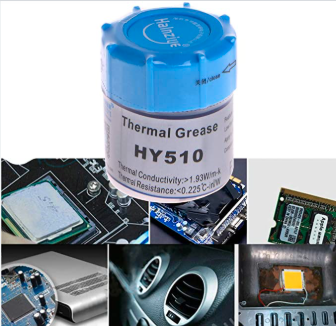
Thermally conductive grease (also called thermal paste or TIM) is a thick paste that helps heat move from electronic parts, like a CPU or GPU, to their cooler (heatsink).
Common types
- Silicone-based: Cheap and easy to use. Safe because they don’t conduct electricity. Heat transfer is okay for everyday computers.
- Ceramic-based: Made with ceramic particles, they move heat better than silicone-based pastes. Still safe for electronics and good for higher-performance CPUs or GPUs.
- . Great for high-end systems, but can conduct electricity, so be careful when applying.
- Carbon-based: Use carbon materials like graphene for very high heat transfer. They don’t conduct electricity and are ideal for high-performance or overclocked systems.
Pros
- Improves heat transfer.
- Prevents overheating and performance drops.
- Often works better than thermal pads.
Cons
- Metal-based versions can cause short circuits if misapplied.
Thermal grease is a small but vital part of cooling systems. Used correctly, it helps electronics run cooler, faster, and longer.
How Does Thermal Grease Work?
- Fills tiny air gaps: Thermal grease fills tiny surface gaps to improve heat transfer between components.
- Improves contact: It smooths out tiny gaps between the CPU and cooler, so they touch more and transfer heat better.
- Contains heat-conductive particles: Thermal grease has tiny bits of metal, ceramic, or other materials that help heat move more quickly.
- Spreads into a thin layer: Pressing the cooler down spreads the grease into an extremely thin film (just a few microns thick), which improves heat transfer efficiency.
- Reduces heat resistance: Without thermal grease, heat has a harder time moving from the chip to the heatsink. With it, thermal resistance drops significantly, keeping components cooler.
- Needs maintenance: Thermal grease can dry up or shift over time, so you may need to reapply it to keep your components cool.
Benefits of Thermally Conductive Grease
- Better Heat Transfer – Fills tiny air gaps between a component and its heatsink, helping heat move away efficiently and keeping electronics cool.
- Low Thermal Resistance – Improves cooling by replacing air with a heat-conductive layer.
- Covers Surfaces Evenly – Its fluid texture spreads into all nooks and uneven surfaces for maximum contact.
- Easy to Apply – Can be brushed, dispensed, or spread, and fits different shapes better than pads.
- Durable in Extreme Conditions – Works across wide temperature ranges and resists chemical damage without breaking down.
- Safe for Electronics – Non-conductive types prevent short circuits in sensitive devices.
- Easy Maintenance – Doesn’t harden, so it can be removed, reapplied, or replaced without mess.
- Versatile Uses – Useful in computers, LEDs, power electronics, cars, telecom equipment, and renewable energy devices.
- Manufacturing-Friendly – No curing needed, spreads well for full coverage, and speeds up production.
Limitations and Considerations of Thermal Grease
- Can Dry Out or Pump Out – The paste may shrink or move out from between the chip and heatsink, reducing its cooling ability.
- Messy to Apply – Using too much can spill over and make future maintenance tricky or even cause short circuits.
- Limited Lifespan – Thermal paste can degrade over time and may need reapplication every 1–2 years.
- Risk of Short Circuits – Some pastes contain conductive materials. If they touch other components, they could cause electrical problems.
- Not Ideal for High Pressure – Strong mechanical pressure can squeeze the paste out, lowering its effectiveness.
- Material Compatibility – Not every paste works with all surfaces; using the wrong one can damage components.
Best Practices for Use
- Use a small amount – A pea-sized drop in the center is enough; pressure spreads it evenly.
- Don’t overapply – Avoid spills and potential electrical hazards.
- Clean surfaces first – Remove old paste, dust, and oils with isopropyl alcohol.
- Reapply as needed – Typically every 1–2 years to keep components cool and efficient.
Comparison with Other Thermal Interface Materials
TIMs transfer heat between components.
Thermal Grease vs. Thermal Pads
- Thermal Grease:
- Flexibility: Fills tiny gaps between surfaces, reducing heat resistance.
- Performance: Conducts heat well, ideal for high-performance components.
- Drawbacks: Can be messy and tricky to apply correctly.
- Thermal Pads:
- Ease of Use: Easy to apply, clean, and speeds up assembly.
- Cleanliness: No cleanup needed, good for automated production.
- Performance: Less efficient at heat transfer but effective for larger gaps or uneven surfaces.
Thermal Grease vs. Phase-Change Materials (PCMs)
- Thermal Grease:
- Reusability: Not reusable; must reapply after disassembly.
- Performance: Excellent when applied correctly.
- Maintenance: Needs monitoring and replacement over time.
- Phase-Change Materials:
- Reusability: Can be reused; solidifies and maintains contact pressure.
- Automation: Easier for manufacturing—no manual application needed.
- Performance: Consistent thermal transfer, good for challenging thermal setups.
How to Apply Thermal Paste Correctly
Applying it properly keeps your components running cooler.
Step-by-Step Guide
- Clean the Surfaces: Clean the CPU/GPU and heat sink with a lint-free cloth dipped in 90% (or higher) isopropyl alcohol to remove dust, oil, and old thermal paste. Remove dust, oils, and old paste for the best heat transfer.
- Install the Heat Sink: Carefully place the heat sink on top. Press down evenly without sliding or rotating, which can trap air bubbles.
- Check for Excess Paste: If the paste spills over, clean it with alcohol and reapply a smaller amount.
Application Methods
- Single Dot (Pea Method): Place one small dot in the center of the CPU.
- Multiple Dots: Spread small dots evenly across the surface.
- Line or Cross: Good for larger chips.
- Manual spreading: You can spread the grease by hand, but it must be done carefully to create an even layer.
Select the method based on your CPU/GPU size, as well as the type of paste.
Common Mistakes
- Too Much Paste: Can insulate instead of conduct, raising temperatures.
- Too Little Paste: Leaves air gaps, reducing efficiency.
- Uneven Spread: Causes hot spots.
- Contamination: Keep the paste away from other components, especially those with conductive types, to prevent short circuits.